Let us consider the Object array like below:
var dynamicArray = new Array(); var dynamicObject1 = new Object();
dynamicObject1.id = "31";
dynamicObject1.name = "Test1";
dynamicArray.push(dynamicObject1);
var dynamicObject2 = new Object();
dynamicObject2.id = "21";
dynamicObject2.name = "Test2";
dynamicArray.push(dynamicObject2);
var dynamicObject3 = new Object();
dynamicObject3.id = "1";
dynamicObject3.name = "Test3";
dynamicArray.push(dynamicObject3);
var dynamicObject4 = new Object();
dynamicObject4.id = "11"
dynamicObject4.name = "Test4";
dynamicArray.push(dynamicObject4);
if we want to sort the array as per the property "id" then we can use below code to achive this:
Code :
function dynamicSort(property)
{
return function (a, b)
{
return (parseInt(a[property]) < parseInt(b[property])) ? -1 : (parseInt(a[property]) > parseInt(b[property])) ? 1 : 0;
}
}
Function Call :
dynamicArray.sort(dynamicSort("id"));
Monday, July 16, 2012
Thursday, July 05, 2012
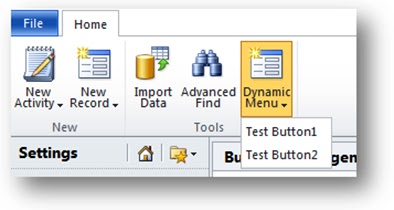
Create Dynamic Ribbon Menu for Application Level Ribbon
I’m going to show you how to dynamically generating menu for the application ribbon button. The end result will like below:
 The procedure uses these steps:
Define the Parent Control
Once you determine the location where you would like to create a dynamic menu, create a CustomAction to add the CommandUIDefinition as shown below.
<CustomAction Id="Add_Dynamic_Menu"
Location="Mscrm.BasicHomeTab.Tools.Controls._children">
<CommandUIDefinition>
<FlyoutAnchor Id="ISV.DynamicFlyoutAnchor"
Sequence="100"
Command="Mscrm.Enabled"
Image16by16="/_imgs/placeholders/ribbon_placeholder_16.png"
Image32by32="/_imgs/ribbon/newrecord32.png"
LabelText="Dynamic Menu"
Alt="Dynamic Menu"
PopulateDynamically="true" ="ISV.PopulateMenu"
TemplateAlias="isv" />
</CommandUIDefinition>
</CustomAction>
PopulateQueryCommand
The value of the CustomAction Location attribute shows that I have chosen to add a FlyoutAnchor to the Tools group of the Basic Home Tab.
Set the value of PopulateDynamically attribute to true. This attribute will tell the rendering engine to populate the content of the menu dynamically. Specify the Id value of the CommandDefinition you will create in the next step to the PopulateQueryCommand attribute. The next step will show how to define the CommandDefinition.
Define CommandDefinitions
There are two CommandDefinition elements:
<CommandDefinition Id="ISV.PopulateMenu">
<EnableRules>
<EnableRule Id="Mscrm.Enabled" />
</EnableRules>
<DisplayRules />
<Actions>
<JavaScriptFunction FunctionName="DynamicMenu"
Library="$webresource:new_dynamicmenupopulator.js">
<CrmParameter Value="CommandProperties" />
</JavaScriptFunction>
</Actions>
</CommandDefinition>
<CommandDefinition Id="ISV.SearchCommand">
<EnableRules />
<DisplayRules />
<Actions>
<JavaScriptFunction FunctionName="Search"
Library="$webresource:new_dynamicmenupopulator.js">
<CrmParameter Value="CommandProperties" />
</JavaScriptFunction>
</Actions>
</CommandDefinition>
Important:
For both CommandDefinition elements, you must use the CrmParameter with the Value attribute set to "CommandProperties". This object will be used later in the script web resources to read which dynamically generated button is selected and to set the dynamically generated ribbon xml.
Create a Script Web Resource
Create a Script Web resource named new_dynamicmenupopulator.js. Set the contents of this JScript library to the following code:
function DynamicMenu(CommandProperties) {
var menuXml = '<Menu Id=\"ISV.DynamicMenu\"><MenuSection Id=\"ISV.Dynamic.MenuSection\" Sequence=\"10\"><Controls Id=\"ISV.Dynamic.Controls\"><Button Id=\"ISV.Dynamic.Button1\" Command=\"ISV.SearchCommand\" Sequence=\"20\" LabelText=\"Test Button1\" Alt=\"Test Button1\" /><Button Id=\"ISV.Dynamic.Button2\" Command=\"ISV.SearchCommand\" Sequence=\"30\" LabelText=\"Test Button2\" Alt=\"Test Button2\" /></Controls></MenuSection></Menu>';
CommandProperties.PopulationXML = menuXml;
}
function Search(CommandProperties) {
var controlId = CommandProperties.SourceControlId;
switch (controlId) {
case 'ISV.Dynamic.Button1':
alert('Button 1 Command Implementation');
break;
case 'ISV.Dynamic.Button2':
alert('Button 2 Command Implementation');
break;
default:
alert('Button Unknown');
}
}
The DynamicMenu function defines the XML for a Menu element containing Button definitions. In this example, there are two buttons defined within a MenuSection element. Each Button uses the following attribute values:
Search Function
The Search function is called when buttons are clicked at run time. Because the CommandDefinition you created in the first step passes the value "CommandProperties", this object is passed through and you can read the SourceControlId property to determine which of the dynamically generated buttons was clicked and perform the appropriate action.
- Define the Parent Control
- Define CommandDefinitions
- Create a Script Web Resource
Define the Parent Control
Once you determine the location where you would like to create a dynamic menu, create a CustomAction to add the CommandUIDefinition as shown below.
<CustomAction Id="Add_Dynamic_Menu"
Location="Mscrm.BasicHomeTab.Tools.Controls._children">
<CommandUIDefinition>
<FlyoutAnchor Id="ISV.DynamicFlyoutAnchor"
Sequence="100"
Command="Mscrm.Enabled"
Image16by16="/_imgs/placeholders/ribbon_placeholder_16.png"
Image32by32="/_imgs/ribbon/newrecord32.png"
LabelText="Dynamic Menu"
Alt="Dynamic Menu"
PopulateDynamically="true" ="ISV.PopulateMenu"
TemplateAlias="isv" />
</CommandUIDefinition>
</CustomAction>
PopulateQueryCommand
The value of the CustomAction Location attribute shows that I have chosen to add a FlyoutAnchor to the Tools group of the Basic Home Tab.
Set the value of PopulateDynamically attribute to true. This attribute will tell the rendering engine to populate the content of the menu dynamically. Specify the Id value of the CommandDefinition you will create in the next step to the PopulateQueryCommand attribute. The next step will show how to define the CommandDefinition.
Define CommandDefinitions
There are two CommandDefinition elements:
- ISV.PopulateMenu: In addition to the “command” property used by standard controls, dynamically populated controls utilize another command “PopulateQueryCommand” which is responsible for retrieving the dynamic data.
- This CommandDefinition will control what elements will be shown.
- It uses the Jscript function named "DynamicMenu".
- ISV.SearchCommand
- This CommandDefinition will control what actions should be performed when the dynamically generated control elements are clicked.
- It uses the Jscript function named "Search".
<CommandDefinition Id="ISV.PopulateMenu">
<EnableRules>
<EnableRule Id="Mscrm.Enabled" />
</EnableRules>
<DisplayRules />
<Actions>
<JavaScriptFunction FunctionName="DynamicMenu"
Library="$webresource:new_dynamicmenupopulator.js">
<CrmParameter Value="CommandProperties" />
</JavaScriptFunction>
</Actions>
</CommandDefinition>
<CommandDefinition Id="ISV.SearchCommand">
<EnableRules />
<DisplayRules />
<Actions>
<JavaScriptFunction FunctionName="Search"
Library="$webresource:new_dynamicmenupopulator.js">
<CrmParameter Value="CommandProperties" />
</JavaScriptFunction>
</Actions>
</CommandDefinition>
Important:
For both CommandDefinition elements, you must use the CrmParameter with the Value attribute set to "CommandProperties". This object will be used later in the script web resources to read which dynamically generated button is selected and to set the dynamically generated ribbon xml.
Create a Script Web Resource
Create a Script Web resource named new_dynamicmenupopulator.js. Set the contents of this JScript library to the following code:
function DynamicMenu(CommandProperties) {
var menuXml = '<Menu Id=\"ISV.DynamicMenu\"><MenuSection Id=\"ISV.Dynamic.MenuSection\" Sequence=\"10\"><Controls Id=\"ISV.Dynamic.Controls\"><Button Id=\"ISV.Dynamic.Button1\" Command=\"ISV.SearchCommand\" Sequence=\"20\" LabelText=\"Test Button1\" Alt=\"Test Button1\" /><Button Id=\"ISV.Dynamic.Button2\" Command=\"ISV.SearchCommand\" Sequence=\"30\" LabelText=\"Test Button2\" Alt=\"Test Button2\" /></Controls></MenuSection></Menu>';
CommandProperties.PopulationXML = menuXml;
}
function Search(CommandProperties) {
var controlId = CommandProperties.SourceControlId;
switch (controlId) {
case 'ISV.Dynamic.Button1':
alert('Button 1 Command Implementation');
break;
case 'ISV.Dynamic.Button2':
alert('Button 2 Command Implementation');
break;
default:
alert('Button Unknown');
}
}
This library contains two functions:
DynamicMenu- Search
The DynamicMenu function defines the XML for a Menu element containing Button definitions. In this example, there are two buttons defined within a MenuSection element. Each Button uses the following attribute values:
- ISV.Dynamic.Button1
- Command: ISV.SearchCommand
- Sequence: 20
- LabelText: Test Button1
- Alt: Test Button1
- ISV.Dynamic.Button2
- Command: ISV.SearchCommand
- Sequence: 30
- LabelText: Test Button2
- Alt: Test Button2
Search Function
The Search function is called when buttons are clicked at run time. Because the CommandDefinition you created in the first step passes the value "CommandProperties", this object is passed through and you can read the SourceControlId property to determine which of the dynamically generated buttons was clicked and perform the appropriate action.
Wednesday, July 04, 2012
Moving CRM 2011 Footer Data to Left Navigation Pane
Would you like to save some space on your CRM 2011 form?
For example, consider the image below, notice how the Footer includes 4 important fields that the administrator wants to show all the time to the users regardless of the section the users are navigating within the Account form:

It would look just like this:

The process to configure this includes 8 steps:
Click on the "Text Editor" button and paste the following code:

Click on the "Text Editor" button and paste the following code:

For example, consider the image below, notice how the Footer includes 4 important fields that the administrator wants to show all the time to the users regardless of the section the users are navigating within the Account form:

What would it look like if we move those fields into the unused space at the bottom of the left navigation pane? It would look just like this:

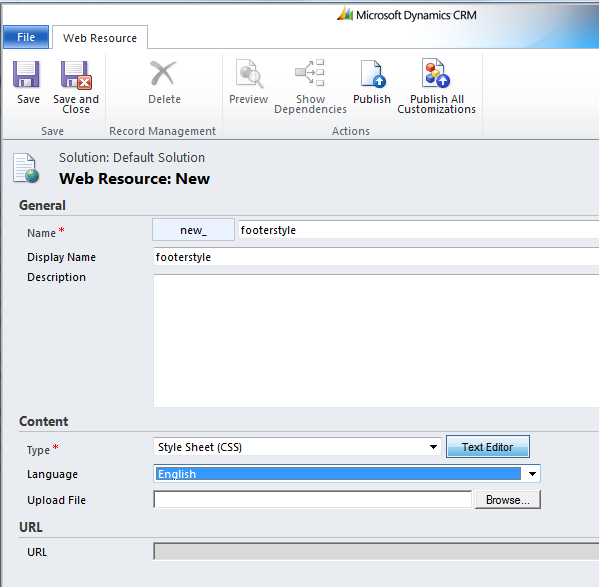
- Create a Web Resource named footerstyle with a Style Sheet (CSS) type:
.ms-crm-Form-Footer
{
display: none;
}
.ftLabel
{
color: #008;
font-style: italic;
padding-left: 4px;
}
.ftValue
{
padding: 2px 2px 8px 12px;
text-align: left;
}
.CustomFoot
{
padding: 2px
}
.leftFoot
{
margin-top: 10px;
margin-left: 2px;
border: solid 1px #008;
width: 99%;
}
Save and publish your changes then Navigate to the form editor of the entity you would like to affect. In this case we will use "Account".
Click on the "Form Properties" button and create a new library to add to the form
function fileload(cssname) {
var reference = document.createElement("link")
reference.setAttribute("rel", "stylesheet")
reference.setAttribute("type", "text/css")
reference.setAttribute("href", cssname)
document.getElementsByTagName("head")[0].appendChild(reference)
}
function SpaceSaver() {
var table = document.getElementById('crmNavBar');
var row = table.insertRow(table.rows.length);
var foot = row.insertCell(0);
var text = document.createTextNode('Test');
foot.appendChild(text);
foot.id = 'CustomFoot';
document.getElementById('CustomFoot').innerHTML = "<table class='leftFoot' cellspacing='0' cellPadding='0'>" +
"<tr><td class='ftLabel'>Customer Since:</td></tr>" +
"<tr><td class='ftValue'>" + document.getElementById('footer_new_customersince_d').childNodes[0].innerHTML + "</td></tr>" +
"<tr><td class='ftLabel'>Primary Contact Info:</td></tr>" +
"<tr><td class='ftValue'>" + document.getElementById('footer_primarycontactid_d').childNodes[0].innerHTML +
"<br />" + document.getElementById('footer_telephone1_d').childNodes[0].innerHTML + "</td></tr>" +
"<tr><td class='ftLabel'>NPS Status:</td></tr>" +
"<tr><td class='ftValue'>" + document.getElementById('footer_new_npsstatus_d').childNodes[0].innerHTML + "</td></tr>" +
"</table>";
}
function FormFooter() {
fileload('/WebResources/new_footerstyle');
SpaceSaver();
}
- On the code shown above, modify the red field names to reflect the fields present on your CRM Footer.
- Create a new Event Handler to call the "FormFooter" function that moves the data from the Footer to the Left Navigation Pane:
Save, Publish and enjoy the new available space!
Tuesday, July 03, 2012
Skype Connector for Microsoft Dynamics CRM 2011
Would you like to make Skype calls directly from CRM 2011?

With this in mind, Zero2Ten has created a Free Skype Connector for Microsoft Dynamics CRM 2011 that will allow you to communicate via Skype directly from a CRM contact record!
This tool has been certified as compatible with Microsoft Dynamics CRM 2011 and it is available and listed on Microsoft Pinpoint and the Microsoft Dynamics Marketplace.
Here are the steps to deploy this solution:

Here is a screenshot of the button displaying all available options:
 Here is a screenshot on a contact without a Skype Name:


With the acquisition of Skype by Microsoft; Microsoft and Skype will remain focused on their shared goal of connecting all people across all devices and accelerating both companies' efforts to transform real-time communications for consumers and enterprise customers. With this in mind, Zero2Ten has created a Free Skype Connector for Microsoft Dynamics CRM 2011 that will allow you to communicate via Skype directly from a CRM contact record!
This tool has been certified as compatible with Microsoft Dynamics CRM 2011 and it is available and listed on Microsoft Pinpoint and the Microsoft Dynamics Marketplace.
- Download our SkypeIntegration_1_0_managed.zip from: http://www.zero2ten.com/skype2crm.aspx
- In CRM 2011 while logged in as a CRM System Administrator, Navigate to Settings -> Solutions -> "Import"
- Import the SkypeIntegration_1_0_managed.zip solution downloaded in step 1.
- This solution will create a new field on the contact form that will allow you to save each contact's Skype Name. A button will be also imported as part of the solution that will be displayed in the Contact Form's ribbon. This button will dynamically generate the options available depending on the information present in the form.
Here is a screenshot of the button displaying all available options:


- When you click any of the options for the first time, depending on your Internet Explorer settings you might receive the two warnings below; to ensure smooth operation of ongoing Skype Actions we recommend you select the options marked in Red:
- Also, the first the time that you make a Skype call, you will receive the warning below; to ensure smooth operation of ongoing Skype Calls we recommend you select the option marked in Red:
Monday, July 02, 2012
How to Debug CRM 2011 online plugin
Below are the steps to debug online plugin:


- Install Plugin Pro-filer in the plugin registration Tool.(if you don’t find this option, download latest SDK)
- Now Register the plug-in and step on the Microsoft Dynamics CRM server. Keep a copy of the debug compiled plug-in assembly on the computer where you are running the tool(@SDK\sdk\tools\pluginregistration\bin\Debug)
- Select a plug-in step and click Profile to enable profiling.
- Perform the operation in Microsoft Dynamics CRM that causes the plug-in to run. Ex: Here updation of Account which trigger the plugin
- Now the plug-in throws an exception and the Business Process Error dialog is displayed, click Download Log File and save this file.
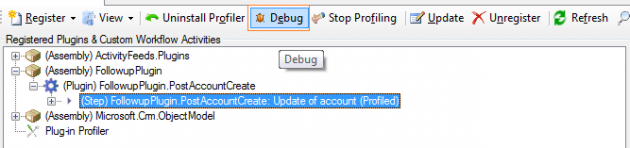
- In the Plug-in Registration tool, click Debug.
- Debug Dialog will open
- select the Saved Error Log File in the “Profile Location” and then select the Plugin assembly location in the “Assembly Location” where .rdb file available to debug. select the plugin which needs to be debug in the “Plug-in” dropdown list.
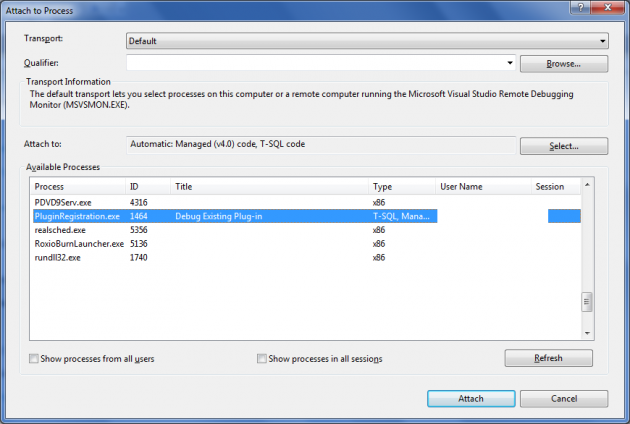
- Now open the plugin solution in Visual Studio and then place the break point to debug, attach the debugger to PluginRegistration.exe process
- Click Start Plug-in Execution in the Debug Existing Plug-in dialog box
- Now the debugger will start debugging from the break point in the VS. Now you can debug the plugin in the normal way like on-premise
Resolution to the build error when microsoft.identitymodel is not refered
If you have installed the Windows Identity Foundation but can't find the Microsoft.IdentityModel dll. Then by adding the following reference to the csproj file in notepad :
<Reference Include="Microsoft.IdentityModel, Version=3.5.0.0, Culture=neutral, PublicKeyToken=31bf3856ad364e35, processorArchitecture=MSIL" /> It works... |
Subscribe to:
Posts (Atom)